30-Minute Lemon Pepper Pasta with Browned Butter

30-Minute Lemon Pepper Pasta with Browned Butter

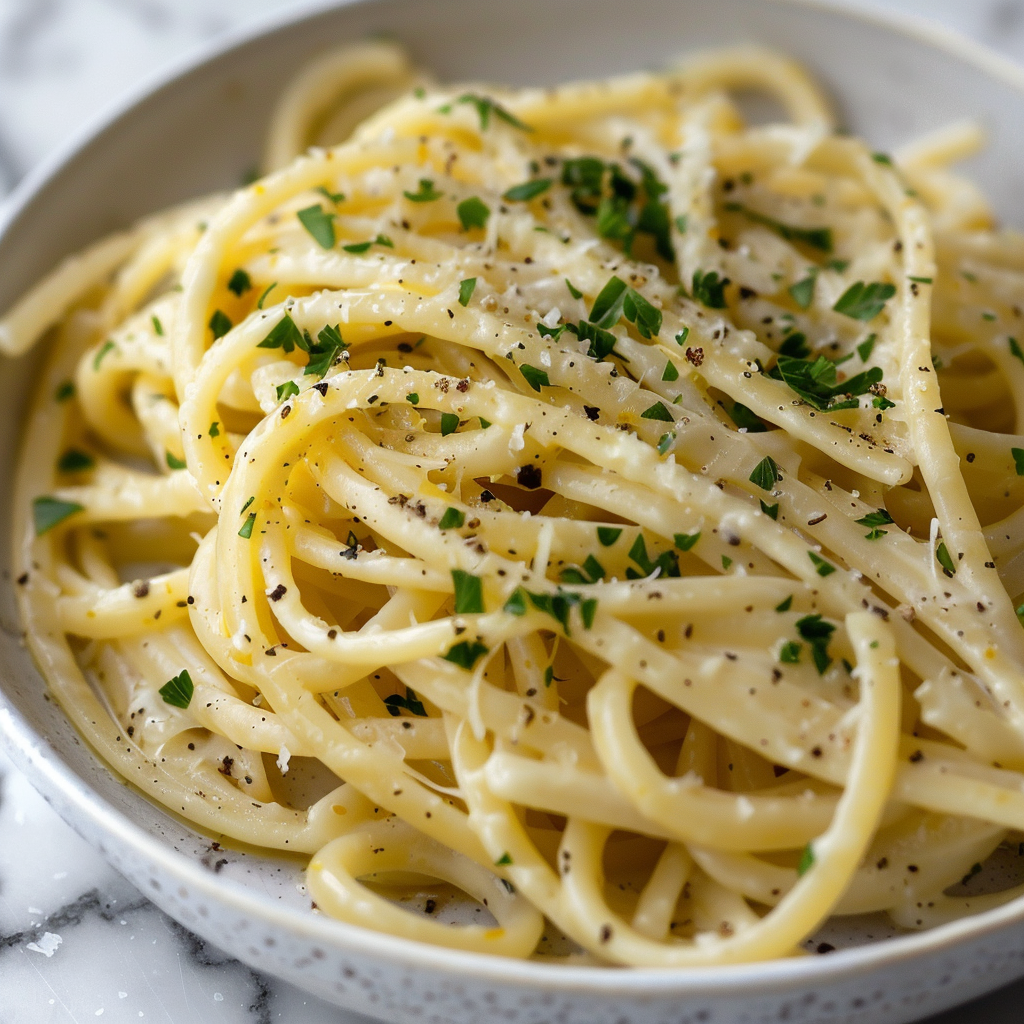
Imagine that, after a long day, you’re hungry but takeaway seems dull. Afraid not! Your shining hero is this browned butter and lemon pepper spaghetti. It’s incredibly flavorful, ready in less than thirty minutes, and far simpler to prepare than you might imagine. Here’s some bright lemon, rich butter, and a little spice of pepper in a fantastic pasta dish. Prepared to forgo the takeaway menu and create something spectacular? Come with me!

What Makes This Creamy Lemon Pepper Pasta So Good?

This recipe is a triple threat: fast, flavorful, and flexible. It comes together in under 30 minutes, perfect for busy weeknights. But don’t be fooled by its simplicity – the combination of tangy lemon, rich browned butter, and a peppery bite creates a truly addictive flavor profile. Plus, it’s easily customized to suit your dietary needs and taste preferences, making it a recipe you can turn to again and again.

Overview of Ingredients For Lemon Pasta with Brown Butter

Overview of Ingredients For Lemon Pasta with Brown Butter

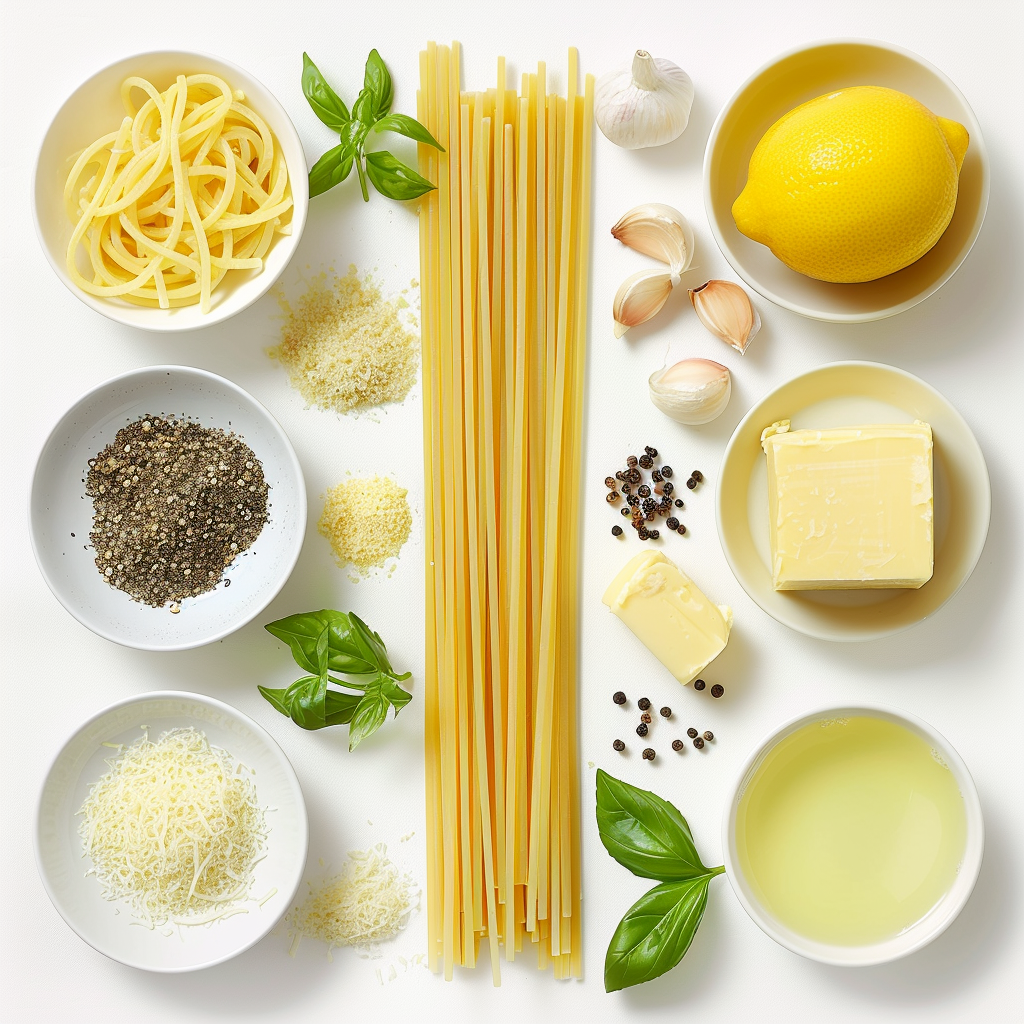
This dish relies on a handful of key ingredients to create a symphony of flavors:

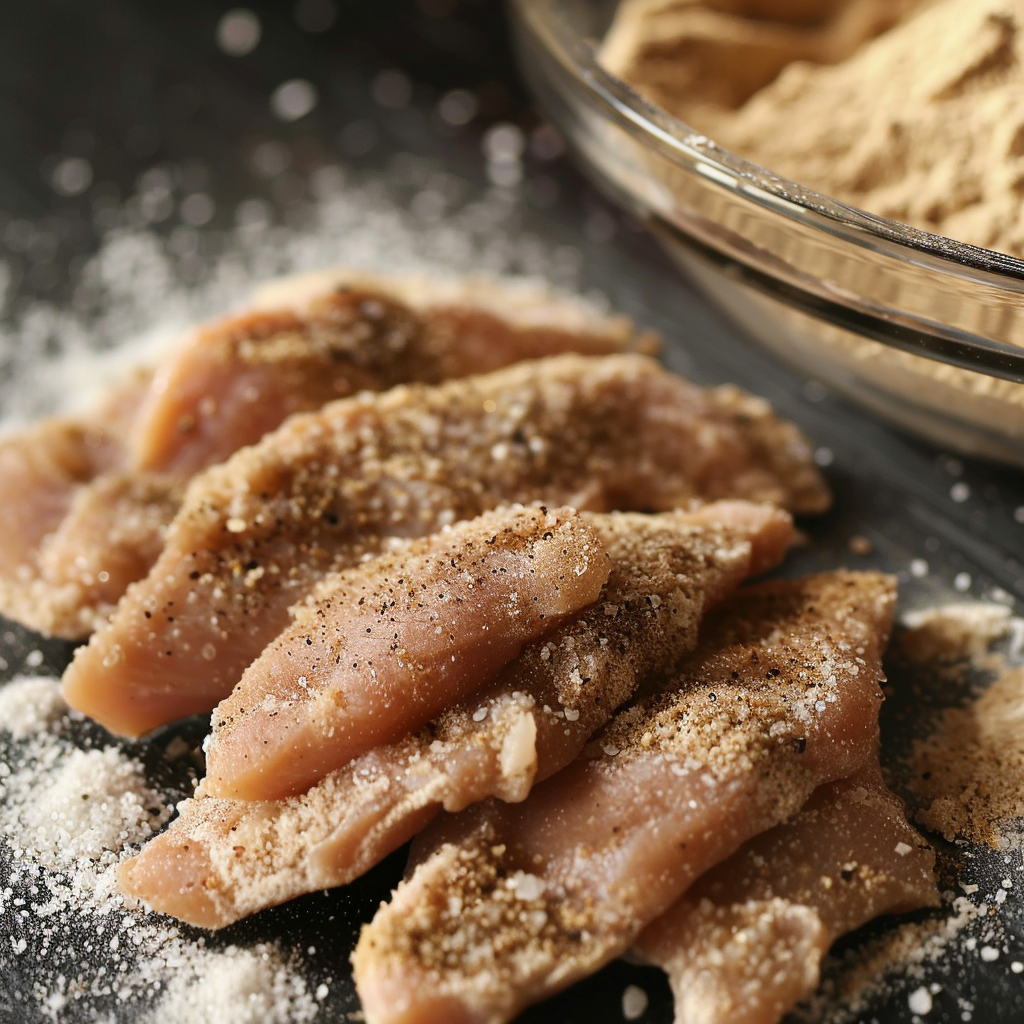
Pasta (1 pound): Choose your favorite type, like penne, rigatoni, or spaghetti. Opt for bronze-cut pasta for an even better sauce clinging texture (optional).

Butter (1/2 cup): Unsalted butter is preferred for more control over the final flavor.

Lemon (1): You’ll need both the zest (for vibrant citrus notes) and juice (for a refreshing tang) for maximum lemon impact.

Black pepper (freshly ground): Freshly ground black pepper offers a more intense and aromatic punch compared to pre-ground pepper.

Parmesan cheese (optional, for garnish): A sprinkle of Parmesan adds a salty and nutty finishing touch.

Elevating Your Lemon Pepper Pasta with Browned Butter

Elevating Your Lemon Pepper Pasta with Browned Butter

Now that you’re familiar with the magic of lemon pepper pasta with browned butter, let’s elevate your dish to new heights!

Chef’s Tips for Perfect Lemon Pepper Pasta Recipe

  • Pasta Perfection

Use high-quality pasta, ideally bronze-cut for a better sauce clinging texture.

Salt your pasta water generously for extra flavor.

Cook the pasta al dente, which means slightly firm to the bite. This ensures a perfect texture in the final dish.

Reserve a little bit of the pasta water before draining. This starchy water helps create a silky smooth sauce.

  • The Art of Browning Butter

Unsalted butter allows for more control over the final flavor.

Use a light-colored pan to easily see the butter browning.

Cook over medium heat. Patience is key! You want a golden brown color, not burnt butter (which will taste bitter).

The nutty aroma is your cue for perfectly browned butter.

  • Flavorful Enhancements

A microplane is a handy tool for finely grating lemon zest, releasing the most flavor.

Ripe lemons offer the juiciest flavor.

Freshly ground black pepper adds a more intense and aromatic punch compared to pre-ground pepper.

A pinch of red pepper flakes can add a touch of heat for those who like it spicy.

Customizing Your Dish: Endless Variations

The beauty of this recipe lies in its versatility. Here are some ideas to personalize your lemon pepper pasta:

  • Protein Powerhouses:

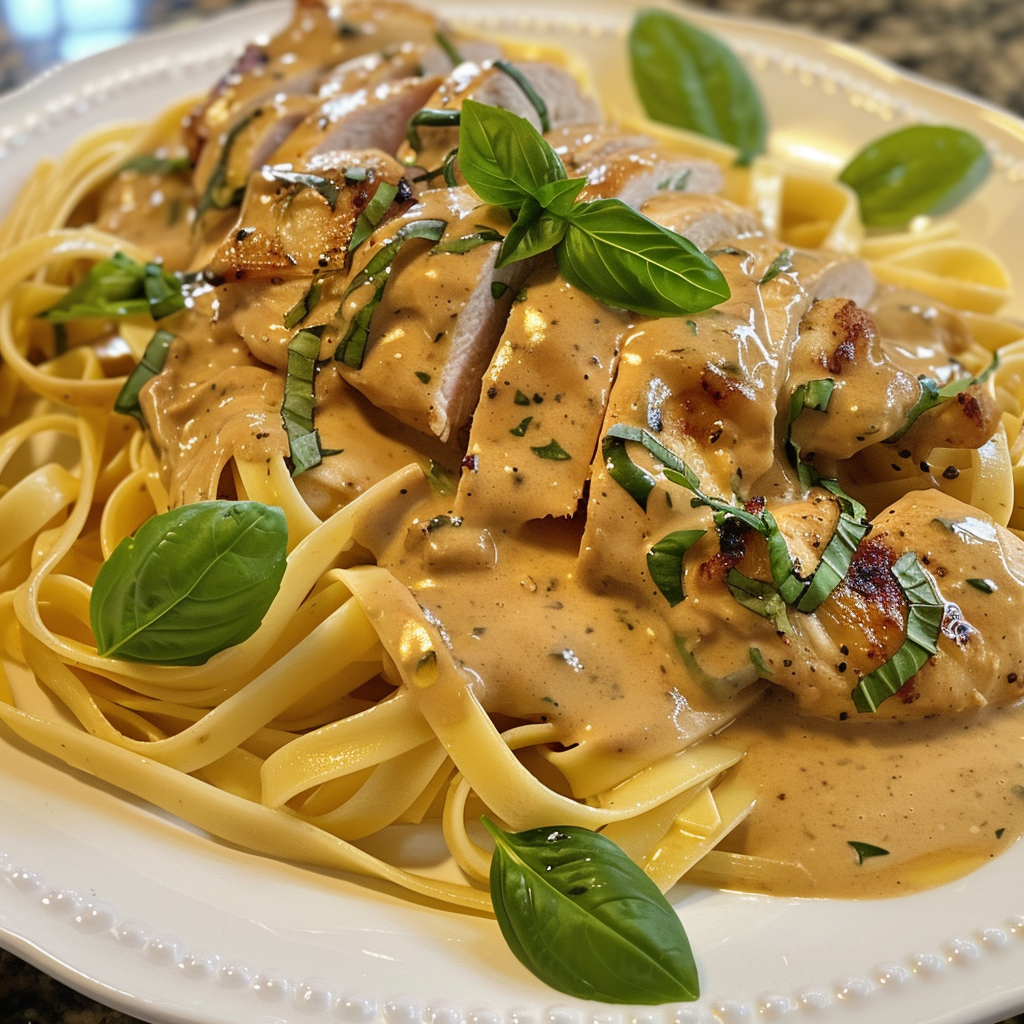
Cooked shrimp, chicken, or tofu add a satisfying protein boost.

Seared scallops offer a luxurious touch for a special occasion.

  • Vegetable Medley:

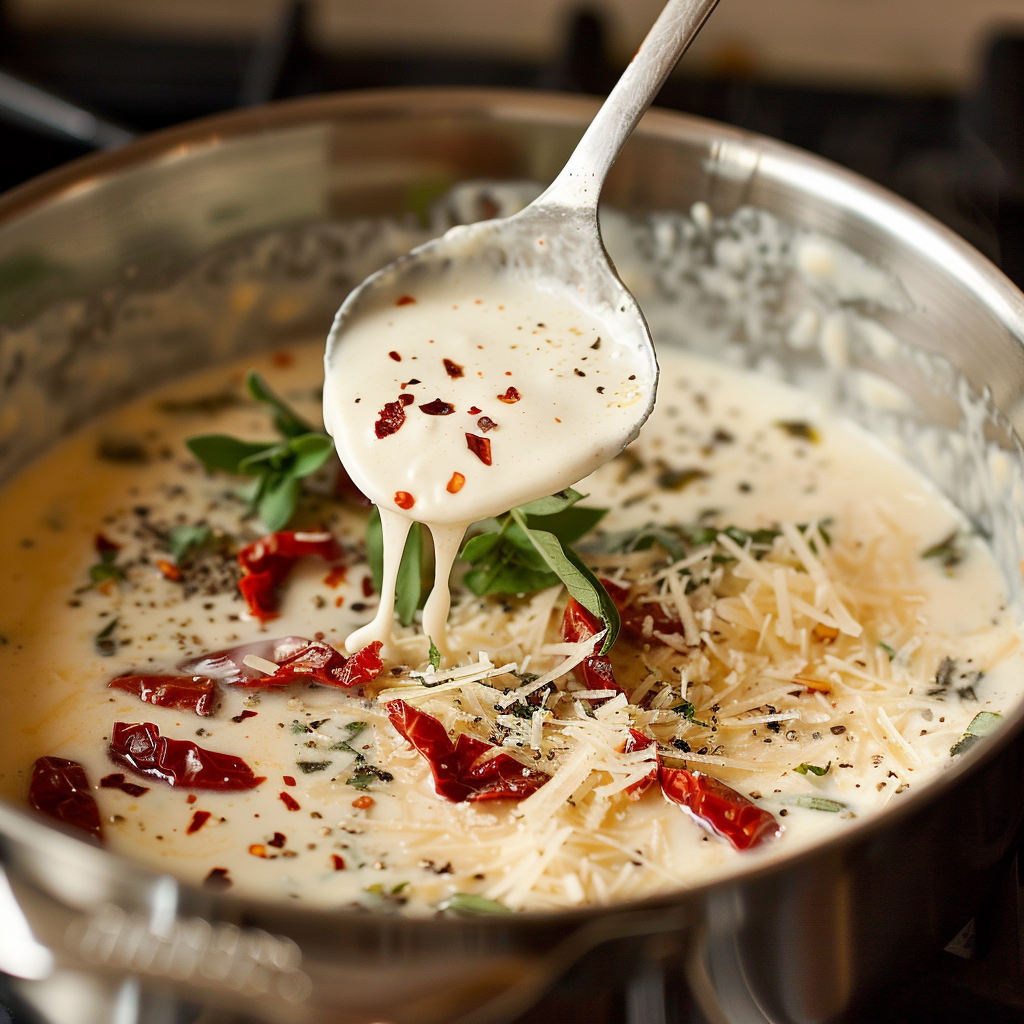
Sun-dried tomatoes add a tangy sweetness.

Sautéed spinach or kale provide a healthy dose of greens.

Roasted broccoli or asparagus add a more substantial bite.

  • Herbaceous Delights:

Freshly chopped parsley, basil, or chives add a burst of brightness.

Dried herbs like oregano or thyme offer a different flavor profile.

  • Creamy Comfort

A splash of heavy cream or mascarpone cheese creates a luxuriously creamy sauce.

Mixing in grated ricotta cheese adds a touch of tang and creaminess.

  • Cheese Symphony

Experiment with different cheeses like goat cheese, feta, or mozzarella for a variety of textures and flavors.

Cheese Symphony

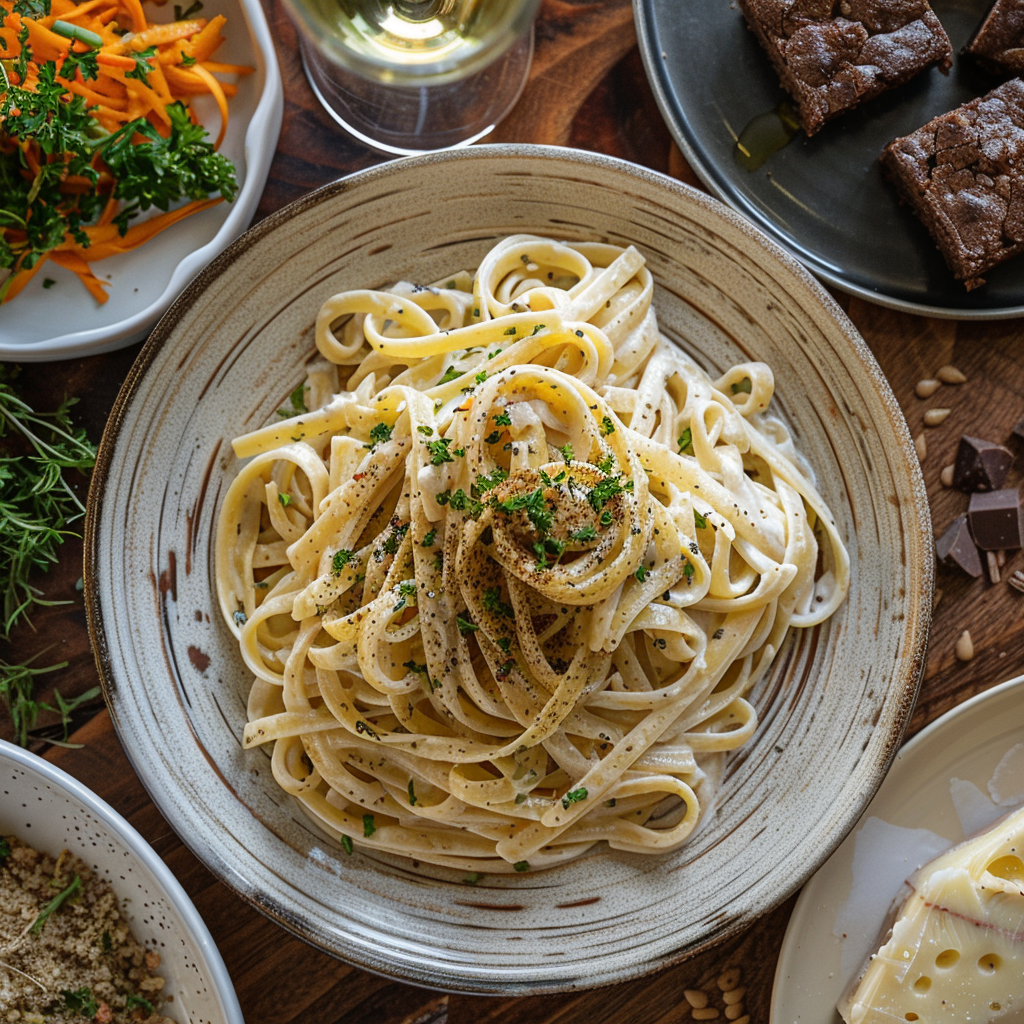
What to Serve with Lemon Pepper Pasta

This light and flavorful dish pairs well with a variety of sides and drinks:

  • Light and Refreshing Sides:

Taco Salad with Catalina Dressing adds a refreshing counterpoint.

Roasted vegetables with herbs complement the flavors perfectly.

Grilled summer squash or zucchini provides a light and healthy side.

  • Hearty Pairings:

Crusty bread for dipping in the delicious sauce.

Garlic bread adds a comforting touch.

  • Complementary Drinks:

A crisp white wine like Sauvignon Blanc or Pinot Grigio enhances the flavors of the dish.

Sparkling water or iced tea offer a lighter beverage option.

Example Menus:

Example Menus

These are just a few ideas to get you started. When planning your menu, remember to consider your dietary needs.

Health Benefits

This recipe boasts several health benefits thanks to its key ingredients:

Pasta: Provides complex carbohydrates for sustained energy.

Lemon: Rich in vitamin C, which supports the immune system.

Black pepper: May aid digestion and has anti-inflammatory properties.

Healthy Customization Options:

Looking for a lighter option? Here are some healthy tweaks:

Use whole-wheat or brown rice pasta for added fiber.

Substitute olive oil for butter for a heart-healthy fat.

Replace Parmesan cheese with a lighter cheese or nutritional yeast.

We love hearing from our readers! Did you whip up this lemon pepper pasta? Perhaps you added a protein like shrimp or tofu, or maybe swapped the Parmesan for another cheese? Share your variations and culinary creations in the comments below – we can’t wait to see what delicious dishes you bring to life!

Print

30-Minute Lemon Pepper Pasta with Browned Butter

This 30-minute Lemon Pepper Pasta with Browned Butter is a lifesaver for busy weeknights. Packed with bright lemon flavor and rich browned butter, it’s a simple yet satisfying dish that will tantalize your taste buds
  • Author: Gabriela cardenas
  • Prep Time: 15 minutes
  • Cook Time: 15 minutes
  • Total Time: 30 minutes
  • Yield: 2
  • Category: Main Course
  • Method: Stovetop
  • Cuisine: Italian
  • Diet: Vegetarian

Ingredients

  • 1 pound (454 g) pasta (penne, rigatoni, spaghetti, etc.)
  • 1/2 cup (1 stick) unsalted butter
  • 1 large lemon, zested and juiced
  • 4 cloves garlic, minced
  • 1/2 teaspoon freshly ground black pepper (or more to taste)
  • 1/4 cup grated Parmesan cheese (optional)
  • Salt, to taste
  • Fresh parsley or basil, chopped (for garnish, optional)

Instructions

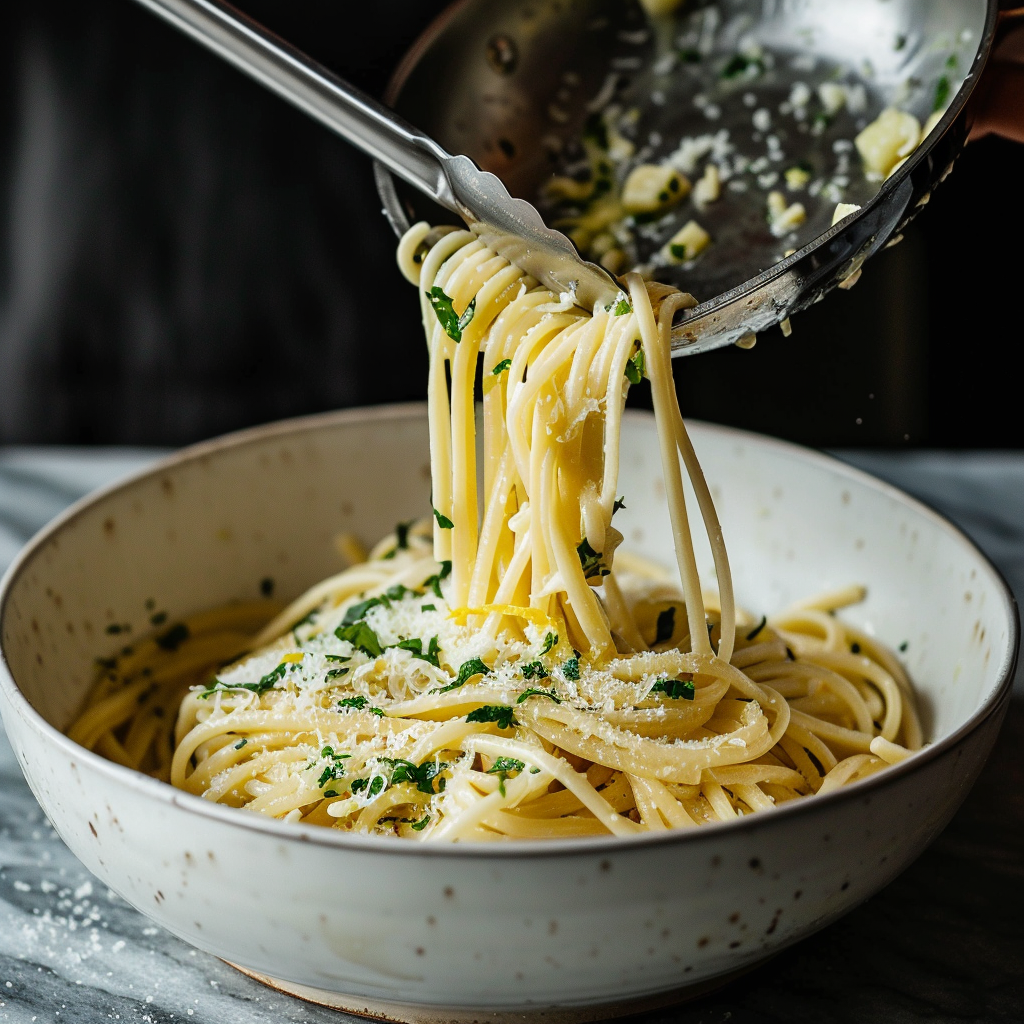
  • Cook the Pasta: Bring a large pot of salted water to a boil. Add the pasta and cook according to package instructions for al dente. Reserve 1 cup of the pasta water before draining.

  • Brown the Butter: While the pasta cooks, melt the butter in a large skillet over medium heat. Cook until the butter turns golden brown and releases a nutty aroma, swirling the pan occasionally. Be careful not to burn the butter.

  • Add the Flavorings: Add the minced garlic to the browned butter and cook for 30 seconds, stirring constantly, until fragrant.

  • Incorporate the Lemon: Stir in the lemon zest and juice, along with the black pepper. Let the sauce simmer for a minute, allowing the flavors to meld.

  • Toss and Season: Drain the pasta and immediately transfer it to the skillet with the sauce. Toss the pasta with the sauce until it’s evenly coated. Season with salt to taste, adding more black pepper if desired.

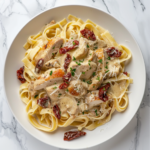
  • Serve and Enjoy: If you’re using Parmesan cheese, add it now and toss to combine. Plate the pasta and garnish with fresh parsley or basil for a pop of color, if desired. Serve immediately and enjoy your delicious lemon pepper pasta with browned butter!

Notes

  • For a richer sauce: Add a splash of heavy cream or milk after tossing the pasta with the sauce.
  • Vegetarian option: Substitute olive oil for the butter or use a vegan butter alternative.
  • Spicy twist: Add a pinch of red pepper flakes to the browned butter for a touch of heat.
  • Leftovers: Store in an airtight container in the refrigerator for up to 3 days. Reheat gently in a pan over low heat with a splash of pasta water or milk to loosen the sauce.
  • Diet: Vegetarian (with butter substitution)

Keywords: Lemon Pepper Pasta with Browned Butter, Lemon Pasta with Brown Butter Creamy Lemon Pepper Pasta One-Pot Lemon Pepper Pasta Easy Lemon Pepper Pasta Recipe Browned Butter Pasta Sauce Lemon Garlic Pasta Light Pasta Dishes Weeknight Pasta Dinners

Did you make this recipe?

Share a photo and tag us — we can't wait to see what you've made!

Easy Chicken Cobbler Recipe with Cheesy Biscuit Topping

Easy Chicken Cobbler Recipe with Cheesy Biscuit Topping

The chicken cobbler has quickly become a popular comfort dish with its savory chicken and vegetable fillings and light biscuit topping. This recipe is perfect for any time of year since it provides a satisfying, substantial supper.

overview of ingredients

overview of ingredients

Rotisserie Chicken: Utilizing a store-bought rotisserie chicken saves time and ensures your cobbler is packed with tender, flavorful meat. You’ll want to remove the meat and chop it into bite-sized pieces. For those looking for more meat in their dish, opting for a ‘family size’ chicken from places like Sam’s Club or Costco can provide that extra bulk.

Frozen Peas and Carrots: This classic vegetable combination adds color, texture, and nutrients to the dish. They’re convenient and easy to use, requiring no prep work. Feel free to substitute or add other vegetables according to your preference.

Cream of Chicken Soup with Herbs: This ingredient thickens the cobbler’s filling, adding depth with its herb-infused flavor. If you can’t find the herb version, regular cream of chicken soup works just as well. For a homemade touch, consider making your cream of chicken soup.

Chicken Broth thins out the cream of chicken soup to the perfect consistency and adds another layer of chicken flavor. If you’re watching your salt intake, opt for low—or no-sodium options.

Garlic Powder, Onion Powder, and Pepper: These seasonings are essential for adding depth and enhancing the overall flavor of the cobbler. Feel free to adjust the quantities to suit your taste or add other spices you enjoy.

Cheddar Bay Biscuit Mix: The biscuit topping sets this cobbler apart, creating an irresistible, cheesy, buttery crust. While this recipe mentions Cheddar Bay Biscuit Mix, you can experiment with other biscuit mixes. Just remember to adjust for flavor differences.

Shredded Cheddar Cheese: Mixed into the biscuit dough, it adds a wonderful cheesy flavor that complements the chicken and vegetables beautifully. Freshly shredded cheese is recommended for the best melt and flavor.

What Makes a Good Chicken Cobbler Recipe

A great chicken cobbler recipe is all about balance and flavor. Here are the key components:

Seasoning: The right blend of spices can elevate your cobbler from good to unforgettable. Consider exploring the Best Seasoning for Chicken for tips on how to season your chicken perfectly.

Chicken: Using rotisserie chicken saves time and adds depth to the dish’s flavor.

Biscuit Topping: A golden, buttery biscuit topping is crucial. For a twist, check out the Cheddar Bay Biscuit Chicken Pot Pie for inspiration on incorporating cheese into your biscuit dough.

Assemble

Chef’s Tips for the Perfect Chicken Cobbler

Prep Your Ingredients

Before you start, make sure all your ingredients are prepared and measured, including chopping the chicken, measuring the frozen peas and carrots, and pre-mixing dry ingredients. Having everything ready will make the process smoother and ensure you get all the don’t steps.

Layer Carefully

When assembling your Chicken Cobbler, consider the layers. Each layer serves a purpose, from the melted butter at the bottom to the chicken and vegetables, the creamy mixture, and the biscuit mix on top. Resist the urge to stir these layers together. The stratification is key to achieving every bite’s perfect texture and flavor profile.

Check for Doneness

Oven temperatures can vary, so it’s important to check your cobbler towards the end of the baking time. The top should be golden brown, and the filling should be bubbly around the edges. If the top is browning too quickly but the filling isn’t quite done, you can loosely cover the dish with aluminum foil to prevent over-browning.

Rest Before Serving

Allow your Chicken Cobbler to rest for at least 10 minutes after removing it from the oven. This resting period lets the filling thicken up, making it easier to serve and ensuring that each serving holds together nicely on the plate.


What to Serve with Chicken Cobbler

This dish is a meal in itself, but you can complement it with:

A crisp green salad

Steamed green beans or broccoli

light dessert, like fruit compote

Health Benefits

While chicken cobbler is a comfort dish, it can also be nutritious, offering:

Protein from the chicken

A variety of vitamins and minerals from added vegetables

The option to use whole wheat flour for the biscuit topping for added fiber

The Chicken Quinoa Soup offers a nutritious and comforting option for lighter or alternative chicken recipes.

Happy Cooking

Print

Chicken Cobbler

Tender chicken, a cheesy biscuit topping, and a simple Cobbler recipe—that’s all you need for a night of pure comfort. Great for any kind of family meal!

  • Author: Gabriela cardenas
  • Prep Time: 15 minutes
  • Cook Time: 30 minutes
  • Total Time: 45 minutes
  • Yield: 4-6
  • Category: Main Course
  • Method: Baking
  • Cuisine: American

Ingredients

  • 1 rotisserie chicken, meat removed and chopped
  • 1 cup frozen peas and carrots
  • 1 can (10.5 oz) cream of chicken soup with herbs
  • 1/2 cup chicken broth
  • 1/2 teaspoon garlic powder
  • 1/2 teaspoon onion powder
  • 1/4 teaspoon pepper
  • 2 cups Cheddar Bay biscuit mix
  • 1 cup shredded cheddar cheese

Instructions

  1. Preheat the Oven: Set to 375°F (190°C).
  2. Prepare the Filling: In a large bowl, mix chopped chicken, frozen peas and carrots, cream of chicken soup, and chicken broth. Season with garlic powder, onion powder, and pepper.
  3. Assemble: Transfer the filling to a greased baking dish.
  4. Make Biscuit Topping: In another bowl, prepare the biscuit mix according to the package instructions, then stir in the shredded cheddar cheese.
  5. Add Topping: Spoon the biscuit mixture over the filling evenly.
  6. Bake: Place in the oven and bake for 25-30 minutes until the topping is golden and the filling is bubbly.
  7. Rest: Allow to cool for 10 minutes before serving.

Notes

  • For a crisper biscuit topping, brush the biscuits with melted butter before baking.
  • If the biscuits are browning too quickly, cover the dish with aluminum foil halfway through baking to avoid over-browning.
  • Customize by adding other vegetables like corn or diced bell peppers to the filling for extra flavor and nutrition.

Explanation: Nutritional Content (Per Serving)

  • Calories: The majority comes from the chicken, biscuit mix, and cheese.
  • Sugar: Minimal sugar, mainly from the vegetables.
  • Sodium: Primarily from the canned soup, broth, and biscuit mix. Opting for low-sodium alternatives can reduce this amount.
  • Fat: Includes both saturated and unsaturated fats from the chicken, cheese, and biscuits. Unsaturated fats are healthier and come mainly from the chicken.
  • Trans Fat: Very low, typically from processed ingredients like the biscuit mix.
  • Carbohydrates: Primarily from the biscuit mix and vegetables.
  • Fiber: Provided by the vegetables; increasing the variety of vegetables can enhance fiber content.
  • Protein: Mainly from the chicken, providing a good source of lean protein.
  • Cholesterol: From chicken and cheese, significant for those monitoring their cholesterol intake.

Tips for a Healthier Version:

  • Reduce Sodium: Use homemade low-sodium cream of chicken soup and opt for low-sodium chicken broth.
  • Lower Fat: Choose low-fat cheese and consider a reduced-fat biscuit mix.
  • Increase Fiber: Add more vegetables like broccoli, beans, or use whole wheat in the biscuit mix.

Nutrition

  • Serving Size: 6
  • Calories: 490 kcal
  • Sugar: 5 g
  • Sodium: 950 mg
  • Fat: 26 g
  • Saturated Fat: 9 g
  • Unsaturated Fat: 12 g
  • Trans Fat: 0.3 g
  • Carbohydrates: 39 g
  • Fiber: 3 g
  • Protein: 25 g
  • Cholesterol: 85 mg

Keywords: Chicken Cobbler Recipe Chicken Biscuit Casserole, Chicken Cobbler Casserole

Did you make this recipe?

Share a photo and tag us — we can't wait to see what you've made!

old fashioned macaroni and cheese

old fashioned macaroni and cheese

Macaroni and cheese, a dish that evokes nostalgia and comfort, has a history as rich as its creamy sauce. This classic comfort food has been a household staple for generations with its tender pasta and rich cheese. Unlike its modern variations, the old-fashioned version adheres to the basics: quality ingredients, simple seasoning, and traditional baking. It’s a testament to the adage that sometimes, the original is hard to beat.

Overview of Ingredients for Old Fashioned Macaroni and Cheese

Overview of Ingredients for Old Fashioned Macaroni and Cheese

Creating a delicious batch of Old Fashioned Macaroni and Cheese involves a combination of staple pantry items and dairy products to create a rich, creamy, and comforting dish. Here’s a breakdown of the main ingredients used in this classic recipe:

Elbow Macaroni

The quintessential pasta choice for macaroni and cheese, elbow macaroni provides the perfect nooks for capturing the cheese sauce. Its shape and size make it ideal for baking dishes.

Sharp Cheddar Cheese 

The dish’s star, providing a deep, tangy flavor essential for the classic macaroni and cheese taste. Sharp cheddar melts well and offers a rich color and taste.

Whole Milk and Heavy Cream

The combination of milk and cream creates a luxurious base for the cheese sauce, making it rich and smooth. Whole milk adds moisture and creaminess, while heavy cream contributes to the velvety texture.

Unsalted Butter and All-Purpose Flour

These two work together to form a roux, the thickening base for the cheese sauce. The butter provides a silky fat base, while the flour helps absorb the butter and thickens the cream mixture.

Seasonings

Salt, black pepper, and garlic powder enhance the flavors. Salt brings out the cheese’s natural flavors, black pepper adds a slight kick, and garlic powder introduces a subtle depth that complements the creamy sauce.

Optional Garnishes

Breadcrumbs can be sprinkled on top for a crunchy texture contrast, while parsley adds a fresh color pop. For those who enjoy extra flavor and texture, bacon bits offer a smoky crunch.

Each ingredient in this recipe has been chosen to contribute to the overall harmony and indulgence of the dish, making it a beloved comfort food that brings warmth and satisfaction to any meal.

The Timeless Appeal of Old Fashioned Macaroni and Cheese

Old-fashioned macaroni and cheese is more than just a meal; it’s a piece of culinary history. Its roots can be traced back to the history of macaroni and cheese, evolving from a sophisticated pasta dish to the beloved comfort food we know today. The appeal lies in its:

Simplicity: A few high-quality ingredients create a comforting and familiar dish.

Richness: The creamy cheese sauce enveloping each piece of pasta offers a taste of indulgence.

Versatility: While perfect, it can also serve as a canvas for additions like breadcrumbs or bacon.

Choosing the right type of cheese is crucial for authenticity. A blend of sharp cheddar for depth of flavor and a smoother cheese like Gouda or Fontina can create a balanced, creamy sauce. For more on choosing the right type of cheese, consider each variety’s texture and melting properties.

Perfecting the traditional mac and cheese

Achieving the quintessential old-fashioned macaroni and cheese requires more than just following a recipe; mastering key techniques and understanding the nuances that elevate the dish from good to unforgettable. Here are some tips to perfect your macaroni and cheese:

Cheese Selection: Opt for high-quality cheese. A sharp cheddar provides a robust flavor, while a softer cheese ensures creaminess.

Pasta Cook Time: Cook your pasta al dente since it will continue to cook in the oven.

Sauce Consistency: For a silky sauce, cook your roux until it’s golden and smells nutty, then whisk in the milk slowly to avoid lumps.

Baking to Perfection: Bake until the top is golden and crispy. Consider adding a breadcrumb topping mixed with melted butter for an extra crunch.

Nutritional Information About baked macaroni cheese

While old-fashioned macaroni and cheese is a comfort food favorite, it’s also rich in calories, fats, and carbohydrates. Here’s a general breakdown for a single serving:

Calories: Approximately 500-600 kcal

Fat: 25-35 grams, depending on the types of cheese and milk used

Carbohydrates: 50-60 grams

Protein: 20-25 grams, a benefit of the cheese and milk

Consider pairing your macaroni and cheese with a light and refreshing Lemon Butter Garlic Shrimp Pasta for a delightful contrast of flavors. The Sun-Dried Tomato and Feta Stuffed French Toast offers a savory twist on a classic favorite for a cozy breakfast or brunch that feels homey and comforting.

FAQs About Old Fashioned Macaroni and Cheese

Can I use different types of cheese?

Yes, you can experiment with various types of cheese in your macaroni and cheese. While sharp cheddar is traditional for its bold flavor, try Gruyère for a nutty taste, Fontina for creaminess, or a bit of Parmesan for a salty kick. Mixing cheeses can add depth and complexity to the dish.

How can I make my macaroni and cheese creamier?

To achieve a creamier texture, ensure you use a good sauce-to-pasta ratio. Adding extra milk or cream to the cheese sauce can also help. Another tip is incorporating cheeses that melt well, such as Fontina or Gouda, into your cheddar base.

Can I make old-fashioned macaroni and cheese ahead of time?

Planning a meal? No problem! You can assemble the macaroni and cheese a day in advance and refrigerate it before baking. If you’re starting from cold, add a few extra minutes to the baking time. Cover it with foil to prevent drying out, then remove it towards the end to make the top golden and crispy. With these simple steps, you can confidently prepare a delicious, nostalgic meal for your loved ones.

Is it possible to make this recipe gluten-free?

Yes, you can make a gluten-free version by using gluten-free pasta and substituting the flour in the roux with a gluten-free flour blend. Ensure that your cheese and any other added ingredients are also gluten-free.

Can I add extras to the macaroni and cheese?

Old-fashioned macaroni and cheese is a recipe and a canvas for your culinary creativity. Add cooked bacon, sautéed mushrooms, caramelized onions, or even lobster for a luxurious twist. Vegetables like peas or broccoli can also be mixed in for added nutrition. The possibilities are endless, and each new variation can bring a fresh wave of nostalgia and comfort to your table.

How do I store and reheat leftovers?

Leftover macaroni and cheese can be stored in an airtight container in the refrigerator for up to 3 days. To reheat, add a splash of milk to prevent it from drying out, then warm it in the oven at 350°F until heated through. You can also reheat it in the microwave, stirring occasionally to ensure it heats evenly.

Can I freeze old-fashioned macaroni and cheese?

Yes, you can freeze it either before or after baking. If freezing before baking, assemble the dish, but hold off on the final bake until you’re ready to eat. If freezing after baking, let it cool completely before freezing. Thaw overnight in the refrigerator and reheat as directed above. Note that the texture may change slightly upon freezing and reheating.

Happy cooking!

Print

old fashioned macaroni and cheese

  • Author: Gabriela cardenas
  • Prep Time: 20 minutes
  • Cook Time: 30 minutes
  • Total Time: 50 minutes
  • Yield: 6
  • Category: Main Course
  • Method: Baking
  • Cuisine: American
  • Diet: Vegetarian

Ingredients

  • 8 ounces elbow macaroni
  • 4 tablespoons butter
  • 2 tablespoons all-purpose flour
  • 2 cups whole milk
  • 1/2 teaspoon salt
  • 1/4 teaspoon ground black pepper
  • 1/4 teaspoon paprika
  • 2 cups shredded sharp cheddar cheese
  • 1 cup shredded Gruyère cheese
  • Breadcrumbs (optional for topping)

Instructions

  1. Preheat your oven to 350°F (175°C).
  2. Cook the macaroni according to package instructions until al dente, then drain.
  3. In a saucepan, melt butter over medium heat. Stir in flour to form a roux, cooking for 1 minute.
  4. Gradually whisk in milk until smooth. Add salt, pepper, and paprika. Cook over medium heat, stirring constantly, until the sauce thickens.
  5. Remove from heat and stir in the cheddar and Gruyère cheeses until melted.
  6. Combine the cooked macaroni and cheese sauce, then transfer to a greased baking dish.
  7. (Optional) Sprinkle breadcrumbs on top for a crispy finish.
  8. Bake for 20-30 minutes, or until bubbly and golden brown.
  9. Let it cool for a few minutes before serving.

Notes

  • For a creamier texture, add an extra 1/2 cup of milk to the sauce.
  • Experiment with different cheeses for new flavors.
  • For a crispy topping, mix breadcrumbs with melted butter before sprinkling over the top.

Did you make this recipe?

Share a photo and tag us — we can't wait to see what you've made!

Marry Me Chicken Pasta

Marry Me Chicken Pasta

Hello! Chef Gabriela Cardenas created this delicious Marry Me Chicken Pasta. I have loved this dish since I made it the night my husband proposed! From my kitchen to yours, it’s more than pasta—it’s love.

FAQs

Can I use chicken thighs instead of breasts?

Yes, though cooking times may vary.

What can I substitute for heavy cream?

A combination of milk and butter can be used, though the sauce may be less rich.

How can I make this dish vegetarian-friendly?

Swap the chicken for a hearty vegetable like portobello mushrooms.

overview of ingredients

  • Chicken Breasts: The star of the dish, chicken breasts, are lean and tender. They’re sliced into cutlets for even cooking and maximum flavour absorption.
  • Pasta: Typically, a long, flat pasta like fettuccine or tagliatelle is used to best capture the creamy sauce. However, penne or rigatoni can also work well for a different texture.
  • Sundried Tomatoes: These bring a sweet-tartness to the dish, adding a layer of complexity to the flavours. They’re also packed with umami, enhancing the overall taste.
  • Heavy Cream: Creates the rich, luxurious base of the sauce. Its thickness is ideal for coating the pasta and chicken, providing a velvety texture.
  • Parmesan Cheese: Adds a nutty, salty depth to the sauce. Freshly grated Parmesan melts better and incorporates more smoothly into the sauce.

Chef’s Tips for Perfect Marry Me Chicken Pasta

  • Choose the Right Pasta: Opt for pasta shapes that hold sauce well, such as fettuccine, tagliatelle, or penne. The choice of pasta can significantly impact the dish’s final texture and flavour profile.
  • Cook Pasta Al Dente: Ensure the pasta is cooked to al dente perfection. It should have a slight bite to it, which not only enhances the texture but also ensures it doesn’t become mushy when mixed with the sauce.
  • Simmer Slowly: Allow the sauce to simmer on a low heat after adding the cream and cheese. This slow simmering process helps the flavours meld together and the sauce thicken to the perfect consistency without separating.
  • Adjust Consistency: If the sauce is too thick, don’t hesitate to thin it with a bit of pasta water. The starchy water adds silkiness and helps adjust the sauce to your desired consistency.
  • Serve Immediately: Marry Me Chicken Pasta is best served immediately while the sauce is creamy and the pasta is perfectly al dente.
  • Pair with Wine: A glass of crisp white wine, such as Chardonnay or Pinot Grigio, complements the creamy sauce and enriches the overall dining experience.

What to Serve with Married me chicken pasta

Vegetables

  • Roasted Asparagus: The slight bitterness of roasted asparagus contrasts beautifully with the creamy pasta, adding a fresh and slightly crunchy element to the meal.
  • Garlicky Green Beans: Sautéed green beans with a hint of garlic add a vibrant colour and a crisp texture that pairs well with the softness of the pasta.
  • Caprese Salad: A simple salad with ripe tomatoes, fresh mozzarella, basil, and a drizzle of balsamic glaze offers a refreshing counterpoint to the hearty pasta.

Breads

  • Crusty Bread: A loaf of crusty bread, such as a baguette or ciabatta, is perfect for mopping up any leftover sauce, ensuring not a drop of the deliciousness goes to waste.
  • Garlic Bread: For a more flavorful option, garlic bread, with its buttery, garlicky crust, makes an excellent companion to Marry Me Chicken Pasta.

Starches

  • Parmesan Risotto: For an ultra-indulgent meal, serve alongside a creamy Parmesan risotto. Its rich texture and flavour complement the pasta without overpowering it.
  • Polenta: A creamy polenta can be a comforting alternative to pasta, especially if you’re serving the Marry Me Chicken as the main course without the pasta.

Lighter Options

  • Zucchini Noodles: For a lighter, low-carb alternative, zucchini noodles (zoodles) offer a fresh, crisp base that pairs well with the creamy chicken.
  • Cauliflower Mash: A creamy cauliflower mash provides a comforting, low-carb side that mimics the texture of mashed potatoes but with a lighter feel.

Wines

  • Chardonnay: A buttery Chardonnay complements the creamy sauce of the pasta, enhancing its richness.
  • Pinot Noir: If you prefer red wine, a light Pinot Noir with its fruity notes can balance the dish’s creaminess without overwhelming the flavours.

Nutritional Highlights of Marry Me Chicken Pasta

  • Protein-Rich: Chicken breasts provide a lean source of protein, crucial for muscle repair and growth.
  • Vitamins and Antioxidants: Sundried tomatoes add vitamin C and antioxidants, enhancing overall health.
  • Calcium and Vitamin D: Heavy cream and Parmesan cheese contribute to calcium and vitamin D intake, which are important for bone health.
  • Carbohydrates for Energy: Pasta offers carbohydrates, the body’s primary energy source, with the option to use whole-grain pasta for added fibre and nutrients.
  • Healthy Fats: Almonds and sunflower seeds provide healthy fats, vitamins, and minerals, boosting the nutritional value of the meal.
  • Moderation Tips: While flavorful, Parmesan cheese and heavy cream also add sodium and fats, which should be consumed in moderation to maintain a balanced diet.

Share Your Story

Did this dish add a spark to your dinner table? I’d love to hear about it! Share your stories, photos, or any modifications you made to the recipe. Connect with us on social media or leave a comment below. Let’s spread the love one recipe at a time!

Enjoy cooking, and may your meals be as filled with love as mine.

Print

Marry Me Chicken Pasta

how to make Marry Me Chicken Pasta, the perfect dish for a romantic dinner. Creamy, flavorful, and utterly irresistible.

  • Author: Gabriela cardenas
  • Prep Time: 15 minutes
  • Cook Time: 25 minutes
  • Total Time: 40 minutes
  • Yield: 4
  • Category: Main Course
  • Method: Sautéing
  • Cuisine: Italian-inspired
  • Diet: Gluten Free

Ingredients

  • 4 chicken breasts, sliced into cutlets
  • Salt and pepper, to taste
  • 1/2 cup all-purpose flour, for dredging
  • 2 tablespoons olive oil
  • 2 tablespoons unsalted butter
  • 3 cloves garlic, minced
  • 1 cup chicken stock
  • 1 cup heavy cream
  • 1/2 cup grated Parmesan cheese
  • 1/4 cup sundried tomatoes, chopped
  • 1 teaspoon chili flakes
  • 1 teaspoon dried oregano
  • Fresh basil leaves, for garnish
  • 8 oz fettuccine pasta, cooked al dente

Instructions

  1. Season chicken cutlets with salt and pepper, then dredge in flour, shaking off excess.
  2. In a large skillet, heat olive oil and butter over medium heat. Add chicken and cook until golden brown on both sides. Remove and set aside.
  3. In the same skillet, add garlic and sauté until fragrant. Pour in chicken stock to deglaze the pan, scraping up any browned bits.
  4. Stir in heavy cream, Parmesan, sundried tomatoes, chili flakes, and oregano. Bring to a simmer.
  5. Return chicken to the skillet, covering with sauce. Cook until the chicken is cooked through and the sauce has thickened, about 10 minutes.
  6. Serve the chicken and sauce over cooked fettuccine, garnished with fresh basi

Notes

  • For a thicker sauce, allow it to simmer and reduce before adding the chicken back into the skillet.
  • Use freshly grated Parmesan for the best flavor and texture in the sauce.
  • If the sauce thickens too much upon cooling, add a splash of pasta water to loosen it up when reheating.

Keywords: creamy chicken pasta, romantic dinner recipes, sundried tomato pasta

Did you make this recipe?

Share a photo and tag us — we can't wait to see what you've made!

4-Ingredient Chicken Salad

4-Ingredient Chicken Salad

Fast and tasty 4-ingredient chicken salad are perfect for busy folks looking for a nutritious supper. Fast lunches, meal preps, and high-protein snack plates are perfect for this chicken dish.

Why choose a 4-ingredient chicken salad?

The beauty of a 4-ingredient recipe lies in its:

Ease and Convenience: Ideal for busy individuals and families.

Flavor Development: Slow cooking melds flavours beautifully, making dishes like chicken and yellow rice incredibly tasty.

Versatility: The crock pot handles many recipes, from soups and stews to casseroles and desserts.

An overhead shot of 4-ingredient chicken salad in a cream bowl.

FAQs

Can I use mayonnaise instead of Greek yogurt?

Yes, though Greek yogurt offers a healthier twist.

Can I add other ingredients?

Absolutely! Add grapes, nuts, or diced apples for extra texture and flavor.

4-ingredient-chicken-salad

Is this chicken salad keto-friendly?

The recipe isn’t strictly keto due to Greek yogurt’s carbs. For a keto version, use full-fat mayo or keto yogurt, check the ranch seasoning’s carbs, or use homemade to stay within carb limits.

Can I use flavored Greek yogurt?

It’s best to use plain Greek yogurt to avoid altering the intended flavor profile of the chicken salad. Flavored yogurts can introduce unwanted sugars and artificial flavors that might not complement the salad’s savory taste.

How can I add more flavor without adding more ingredients?

Experiment with the types of ranch seasoning for different flavor profiles, or add a pinch of smoked paprika or cayenne pepper for a subtle kick. Fresh herbs, like dill or parsley, can enhance the flavor without complicating the ingredient list if you have them on hand.

An overhead shot of 4-ingredient chicken salad in a cream bowl.

The Core Ingredients

Creating this chicken salad requires only 4 simple ingredients, each contributing to the dish’s overall flavor and texture:

Cooked Chicken: Opt for shredded chicken breast or grab a rotisserie chicken for convenience.

Greek yogurt is a healthier alternative to mayonnaise, adding creaminess and a protein boost.

Ranch Seasoning: Provides a zesty flavor that elevates the salad.

Celery or sweet onions add a crunchy texture and freshness to the dish.

Explore our guide on the best seasoning for chicken breast to elevate your salad further.

Health Benefits of Greek Yogurt in Your Chicken Salad

The 4-ingredient chicken salad is not just quick and delicious; it’s also nutritious, thanks to Greek yogurt. This ingredient boosts bone health, muscle mass, and metabolism while reducing appetite. It’s rich in calcium, protein, and probiotics, offering a healthier alternative to mayonnaise. For a deeper dive into Greek yogurt’s benefits, check out 8 health benefits of Greek yogurt on Medical News Today.

Serving and Storage Suggestions

This chicken salad is incredibly versatile. Serve it as a sandwich, on a green salad, or on a snack plate. Store leftovers in an airtight container in the fridge for up to 3–4 days for best freshness.

Conclusion

This 4-ingredient chicken salad is more than just a meal; it’s a quick, healthy, and versatile option that fits perfectly into any diet. Whether you’re a seasoned home cook or a beginner, this recipe promises to deliver on flavor, comfort, and convenience.

Print

4-Ingredient Chicken Salad

easy 4-Ingredient Chicken Salad in just 10 minutes! Perfect for a healthy, delicious lunch or snack. Gluten-free and adaptable for Keto.

  • Author: Gabriela cardenas
  • Prep Time: 10 minutes
  • Cook Time: 0 minutes (assuming chicken is pre-cooked)
  • Total Time: 10 minutes
  • Yield: 4
  • Category: Salad
  • Method: Mixing
  • Cuisine: American

Ingredients

  • 2 cups cooked chicken, shredded (about 1 large chicken breast)
  • 1/2 cup plain Greek yogurt
  • 2 tablespoons ranch seasoning mix
  • 1/2 cup diced celery or sweet onion (based on preference)

Instructions

  1. Prepare the Chicken: If you haven’t already, cook and shred your chicken breast. For convenience, you can also use rotisserie chicken.
  2. Mix Ingredients: In a large bowl, combine the shredded chicken, Greek yogurt, and ranch seasoning. Mix well until the chicken is evenly coated with the yogurt and seasoning.
  3. Add Crunch: Fold in the diced celery or sweet onion into the chicken mixture, ensuring it’s well distributed for crunch in every bite.
  4. Chill (Optional): For best flavor, let the chicken salad chill in the refrigerator for at least 30 minutes before serving. This step is optional but helps the flavors meld together.
  5. Serve: Enjoy your chicken salad on whole-grain bread as a sandwich, atop a bed of greens for a low-carb option, or with crackers for a light snack.

Notes

  • Flavor Variations: Feel free to experiment with different types of ranch seasoning to find your preferred flavor profile. For a spicier kick, a pinch of smoked paprika or cayenne pepper can be added.
  • Serving Suggestions: This chicken salad is versatile. Serve it as a filling for sandwiches, a topping for salads, or a dip with crackers and veggies.
  • Storage: Store any leftovers in an airtight container in the refrigerator for up to 3-4 days. Stir well before serving again.
  • Dietary Adjustments: For a keto-friendly version, substitute Greek yogurt with full-fat mayonnaise or a keto-compliant yogurt, and ensure the ranch seasoning is low in carbs.

Did you make this recipe?

Share a photo and tag us — we can't wait to see what you've made!

Print

4-Ingredient Chicken Salad

  • Author: Gabriela cardenas
  • Prep Time: 10 minutes
  • Cook Time: 0 minutes (using pre-cooked chicken)
  • Total Time: 10 minutes
  • Yield: 4
  • Category: salad
  • Method: Mixing
  • Cuisine: American
  • Diet: Gluten Free

Ingredients

  • 2 cups cooked chicken, shredded
  • 1 cup plain Greek yogurt
  • 2 tablespoons ranch seasoning
  • 1/2 cup celery, finely chopped

Instructions

  1. In a large mixing bowl, combine the shredded chicken and chopped celery.
  2. Add the plain Greek yogurt and ranch seasoning to the bowl.
  3. Mix all the ingredients until well combined and the chicken is evenly coated with the yogurt and seasoning.
  4. Taste and adjust seasoning if necessary. Serve chilled.

Notes

  • For a lighter version, opt for low-fat Greek yogurt.
  • Enhance the flavor with fresh herbs like dill or parsley if desired.
  • Serve on a bed of greens, in a wrap, or as a sandwich for a complete meal.

Keywords: 4-ingredient chicken salad

Did you make this recipe?

Share a photo and tag us — we can’t wait to see what you’ve made!

Exit mobile version